|
Component |
Description and usage |
| .The Access standard
menu bar |

This is the
Access/Windows menu bar providing windows standard functionality together
with access-specific features. While there are facilities here not
provided elsewhere on the screen, they are not used as often as the
toolbar buttons. To get help on menu items and sub-items, click on Help
then click on  then navigate the menu to the item you want help on. Clicking on it will
show you a small amount of textual help.
then navigate the menu to the item you want help on. Clicking on it will
show you a small amount of textual help.
NOTE:
|
| The Access
Toolbar |
Click the link for
more information. |
 The Record Selector: The Record Selector:
|
On some forms this bar goes the
full height of the form and on others is very short and opposite each of a
list of records.
The bar is used to:
-
 Save new and changed
records. You know a record is 'Dirty'
(needs saving because it has been changed) when you see
the Pen in the selector bar as shown. Click
on the bar to save the record. Save new and changed
records. You know a record is 'Dirty'
(needs saving because it has been changed) when you see
the Pen in the selector bar as shown. Click
on the bar to save the record.
-
Select a whole record for
deletion, copying or moving. The whole bar turns BLACK
when a record is selected.
-
Delete records with
the delete key. Confirmation will be required.
-
Cut, Copy and
Paste. This works well with selected records. Careful!!
Cut deletes
records!!
-
Select multiple records in
a multi-record display, more than one record may be selected by
clicking and dragging over the selector bars for those records to be
handled collectively. The selector bars will all turn BLACK.
Deletion will delete all selected records.
|
| The Record Navigator: |

This bar:
-
is used to move through a
set of records.
-
shows the current record's
relative position in the record set (1). NOTE: These numbers do not
always refer to the same record.
-
shows the total number of
records in the set (191).
See the Access
Toolbar for a description of the small button functions. They are the
same as those found in that toolbar. |
| Combo Boxes |

A Combo Box:
Usage:
-
To select a value from the
list use the mouse and click on the down arrow.
-
Click on the value you
require. The list will disappear and leave the selected value as part
of the record. Save the record.
-
You can also preemptively
select a value by starting to type its value and then popping the list
to make final selection. The list will display the list starting at
the nearest value to what you have typed. In very short lists, typing
one or two characters is enough to get exactly the value you want
without opening the full list.
|
| Option Groups |
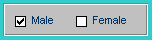
An Option Group:
-
Provides multiple
selections for an item of data.
-
Only One option can
be selected for any given record.
-
The mouse is normally used
to click on the option of choice. The left and right arrow keys can
also be used.
|
| Check Boxes |

A Check Box:
-
Asks the user a question (eg:
Children:- 'Does the employee have children?')
-
Gives the user an On (or
True or Yes) as opposed to an Off (or False or No) selection.
-
With a tick indicates On.
No tick indicates Off.
-
is set using the mouse or
the space bar.
|
| Continuous Sub-Forms |

In a Continuous Sub Form:
-
Many records are displayed
- line below line - associated with the current Main Form's
record.
-
Each new record is created
in the line starting with the 'Star'. If the star is not
visible then use the sub-form's navigator bar to start a new record.
-
Each record has a mini
record selector at the left end. All the usual record status symbols
are displayed in the mini record selector.
-
Saving of records is automated. If you move from changes in
one record directly to another record using the mouse, the system will
auto-save the changed record you just left.
Inaccessible columns of
data normally imply automated calculation of that column's data -
sample the childrens 'Age at Christmas' column. -
Audit Trail data is also
maintained by the system.
If many record are
displayed then use the PgUp/PgDn keys to navigate to the records you
need to see. A scroll bar up the side of the sub-form should also
appear when more records exist than can fit on the sub-form.
|
| Large Text Boxes |
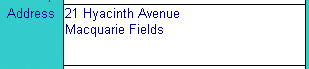
In a Large Text Box:
-
You can type a LOT
of text!
-
If you keep typing to the
right margin the text will auto-wrap.
-
If you must have a new line
then press Ctrl-Enter.
-
Move to the next data entry
box using the Tab key.
|
|
|